Generation of Dynamic Human-aware Navigation Maps using Graph Neural Networks
Contributors: Daniel Rodriguez-Criado, Pilar Bachiller, George Vogiatzis and Luis J. Manso
This work presents a model capable of generating cost maps for Human-Aware Navigation (HAN) with robots that considers the discomfort caused by the robot to pedestrians and the dynamics of the environment. The model is scenario-agnostic, meaning that it can be trained with the dataset provided or use our trained model, and it can be used in any environment without retraining. Our model takes the information from a short video (3 seconds) stored in a graph and directly produces the cost map.
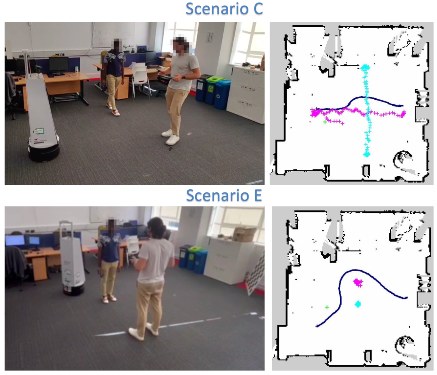
Since the model can generate a map every 11 milliseconds, it can be used in real-time HAN applications. The following two images represent the output of our model for two different room shapes and a real experiment with a robot using our maps in the ROS navigation stack:
Installation
To install the SNGNN2D-v2 model on your machine, follow these steps:
-
Clone the repository:
Terminal window git clone https://github.com/gnns4hri/SNGNN2D-v2.git -
Change directory to the cloned repository:
Terminal window cd SNGNN2D-v2 -
Install in your local machine:
You can create a virtual environment with python and run the following command that will install the necessary packages for running and testing the SNGNN2D-v2 model:
Terminal window python3 -m pip install -r requirements.txt -
Install with docker:
You need to have docker-compose installed for this option
Terminal window docker-compose run --rm sngnn2d-v2
Loading the Dataset
To load the dataset for use with the SNGNN2D-v2 model, follow these steps:
-
Download the dataset: Download our dataset from here. The dataset is available in the file
raw_data.zip. -
Organize the dataset: Unzip the file
raw_data.zipin the project root directory. This will create a directory containing the input data (JSON files) and labels (PNG files) for training and testing the model:DirectorySNGNN2D-v2
- …
Directoryraw_data
- file0000x.json
- img00000x_Q1.png
- …
-
Generate train, dev, and test splits: Navigate to the
dataset/directory and run the following command to generate the train, dev, and test splits:Terminal window cd datasetpython3 generate_train_dev_test.py ../raw_dataAlternatively, you can download the splits used to train the available model from here (files
train_set.txt,dev_set.txtandtest_set.txt). -
Adjust split percentages (optional): If you want to modify the percentages for the train, dev, and test splits, open the
generate_train_dev_test.pyscript and locate line 18. The current percentages are 80% for training, 10% for development, and 10% for testing. You can adjust these percentages as needed.
Once you have generated the splits and confirmed the split percentages, the dataset is ready for training and testing the SNGNN2D-v2 model.
Data augmentation (Optional)
If you wish to increase the size of the dataset you can create new data samples by mirroring the scenes in the dataset.
You can do so using the scripts in the dataset/data_augmentation/ directory.
There is a script to mirror the data horizontally (mirroringH_data.py) and one to do it vertically (mirroringV_data.py).
To run the scripts:
cd data/data_augmentationpython3 mirroringH_data.py path_to_dataset.txtpython3 mirroringV_data.py path_to_dataset.txtYou can run them in any order. It will generate a new TXT file with the new data points.
Training the model
There are two ways of training our model: training a single model with manually specified hyperparameters or training a batch of models using random search hyperparameter tuning. The following sections delve into these two distinct methods.
Single model training
To train a single model, execute the train_single.py script from the project directory:
python3 train_single.pyTo modify the hyperparameters for the specific training, edit the config/parameters.yml file before running the training.
Ensure the paths to the dataset’s txt files are correct.
The model parameters are saved in the trained_models/model_params/ directory, with an interval of five epochs.
A saves/ directory is created after loading the dataset.
This stores a cached version of the dataset to improve loading speed in subsequent training sessions.
If you want to load a different dataset, delete this directory before loading the new dataset.
Batched Training for Hyperparameter Tuning
Before starting the batched training for hyperparameter tuning, you’ll need to generate a list of tasks with varying hyperparameter combinations. To do this, execute the following commands from the project’s root directory:
cd utilspython3 generate_training_hyperparameter_samples.pyThis creates a pickle file in the project root directory named LIST_OF_TASKS.pckl that the training script will utilize to train multiple models with distinct hyperparameter configurations. If you wish to alter the range of hyperparameters included in this list, you can modify the utils/generate_training_hyperparameter_samples.py script.
Once the list of tasks is generated, you can initiate the batched training process using the following command:
python3 train_batched.pyThis command initiates the training of the models specified in the LIST_OF_TASKS.pckl file. The training continues until the script is manually terminated.
The trained models are saved under the directory trained_models/unique_id/, where unique_id is a unique identifier for each model.
To obtain information about the trained models, models remaining to be trained, failed trainings, the best losses, and more, run the following command:
cd utilspython3 generate_training_hyperparameter_samples.pyFor a more concise overview of this information, utilize the utils/check_list.py script:
cd utilspython3 check_list.pyBoth batched and single training methods create a saves/ directory.
This directory stores a cached version of the dataset, enabling the script to load the dataset significantly faster after the initial training.
Testing the Model
To evaluate the performance of either the model you trained or our pre-trained model available here, utilize the test.py script located in the project’s root directory.
To execute the script, provide the path to the JSON file you want to test or a TXT file containing a list of JSON files to evaluate, such as the test_set.txt file generated in the preceding steps using the generate_train_dev_test.py script.
Additionally, specify the path to the model parameters file.
An example of usage is:
python3 test.py -f dataset/test_set.txt -m model/ --cudaThe --cuda parameter enables the script to utilize the GPU and is optional.
Use the option -v to indicate the path of the video files containing the scenarios.
A zip file with all the videos can be downloaded from here.
For detailed instructions on using the script, execute python3 test.py -h.
The script will display the image generated by our model alongside the ground truth image and sn image of the scenario if the video is available. If you provided a TXT file with paths to multiple JSON files, press the Enter key to proceed to the next image. To exit the testing process, press the Esc key or close the window.
Citation
You can use the following BibTex block to cite the work:
Comming...