Synthesizing Traffic Datasetsusing Graph Neural Networks
Contributors: Daniel Rodriguez-Criado, Maria Chli, Luis J. Manso and George Vogiatzis
Traffic congestion in urban areas presents significant challenges, and Intelligent Transportation Systems (ITS) have sought to address these via automated and adaptive controls. However, these systems often struggle to transfer simulated experiences to real-world scenarios.
This project introduces a novel methodology for bridging this `sim-real’ gap by creating photorealistic images from 2D traffic simulations and recorded junction footage. The project uses a novel image generation approach, integrating a Conditional Generative Adversarial Network (cGAN) with a Graph Neural Network (GNN) to facilitate the creation of realistic urban traffic images.
The model harness GNNs’ ability to process abstract information alongside segmented images for preserving locality data. The architecture leverages the power of SPADE and Graph Attention network (GAT) models to create images based on traffic scenarios simulated by SUMO. These images are conditioned by factors such as entity positions, colours, and time of day. The uniqueness of the approach lies in its ability to effectively translate structured and human-readable conditions, encoded as graphs, into realistic images. This advancement contributes to applications requiring rich traffic image datasets, from data augmentation to urban traffic solutions.
Results
The table below illustrates a comparative analysis of our enhanced SPADE models trained with different color encodings against the original SPADE model.
| Models | FID | mIoU | Accu. |
|---|---|---|---|
| Vanilla SPADE | 176.32835 | 0.63349355 | 0.70595584 |
| cluster-colours | 149.88987 | 0.53274998 | 0.69294361 |
| discrete-colours | 154.56592 | 0.50205496 | 0.66411157 |
The following image shows the visual results of the images generated:
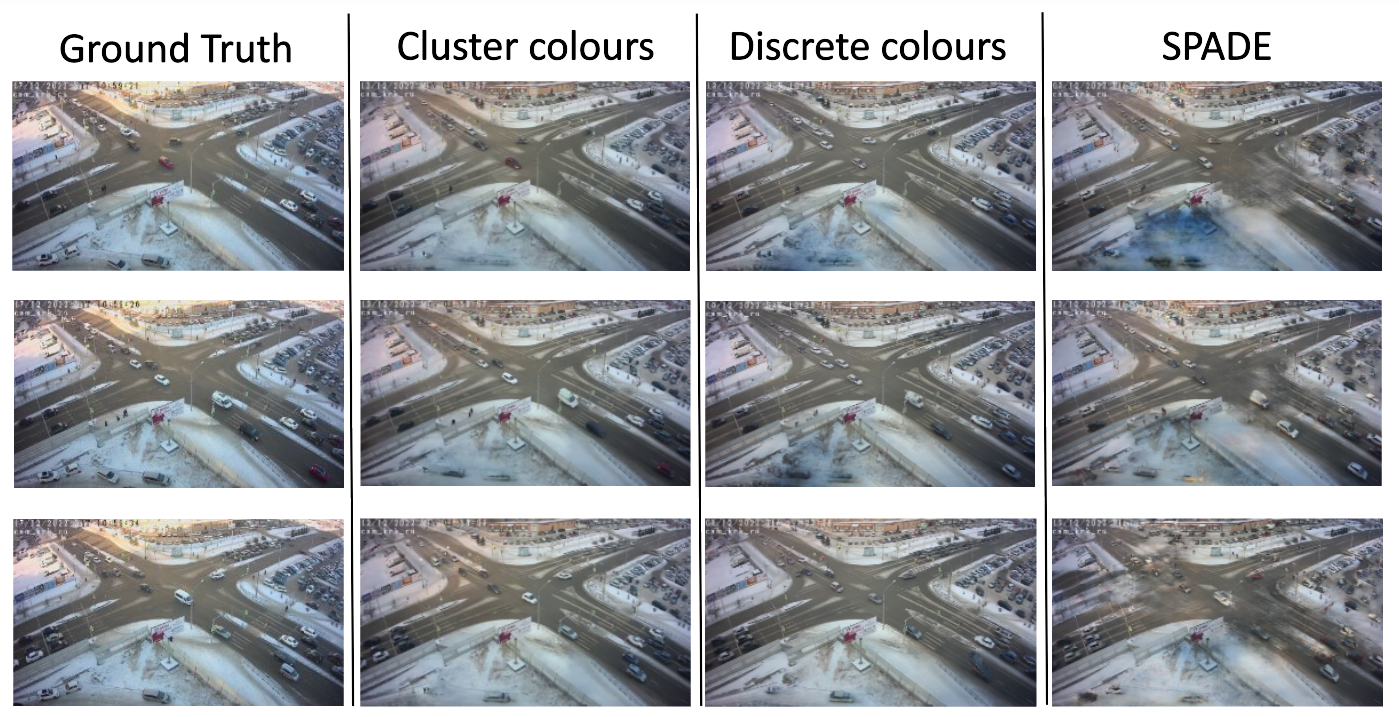
Fig. 1 Visual results of the images generated by the model. The best results are yield by the cluster colours models while the worse are gieven by the vanilla SPADE version
Installing the model
To install the model you just have to clone this repository in your PC, enter the directory and install the requirements.txt in your python environment:
git clone https://github.com/gvogiatzis/trafficgen.gitcd trafficgenpython3 -m pip install -r requirements.pyGenerate dataset
To begin, you’ll need to create a training dataset for your model. Alternatively, you can download pre-prepared datasets from This link. Additionally, a pretrained model tailored for a specific crossroad can be downloaded from here.
Scrapping videos from CCTV camera
If you’re interested in assembling your own dataset, the initial step involves scraping data from a traffic CCTV camera.
You’ll find a convenient script named scraper.py in the tools directory for capturing videos from a CCTV feed.
The script comes preloaded with three distinct video streaming URLs as examples. You’re free to use any of them, or simply insert your preferred link at line 46 in the script.
Once you’ve configured the correct URL, proceed by executing the command below:
bash tools/script_scrap.shThe command initiates the process of saving videos in the directory from which it was run.
After accumulating a sufficient number of videos (we suggest capturing a full 24-hour cycle), you can utilize another script named extract_images.sh found in the tools directory to extract images from the videos.
By executing the subsequent command in the same directory as your scraped videos, a new directory named raw_data will be created, housing all the extracted images:
bash extract_images.shDetecting bounding boxes from the videos
The following step involves detecting the various vehicles and pedestrians present in each of the images extracted previously, along with their bounding boxes. For this task, we utilize YOLOv7, but feel free to use any other object detection model of your preference. We focus on detecting class labels 5, 2, 0, and 7, which correspond to buses, cars, pedestrians, and trucks, respectively. Clone the repo and execute the following commands:
cd yolov7/python3 detect.py --weights yolov7-w6.pt --conf 0.15 --img-size 1280 --source ../raw_data/ --save-txt --save-conf --nosave --classes 5 2 0 7You’ll need to specify the path to your images using the source argument. This action will create a corresponding .txt file for each image in the yolov7/runs/detect/exp/label directory.
Training
These are the steps for training your own model. Start by copying the label/ folder located within yolov7/runs/detect/exp/ and pasting it into raw_data/train/ as “boxes”.
Additionally, copy the images extracted in the previous step and move them to the raw_data/train/images directory.
Finally, navigate to the SPADE directory and execute the subsequent command:
cd ../SPADEpython3 train.py --name traffic3d --dataset_mode custom --label_dir ../raw_data/masks/ --image_dir ../raw_data/images/ --label_nc 5 --no_instance --gpu_ids 0 --batchSize 6 --niter 100 --no_flip --crop_size 640 --load_size 640You have the flexibility to define several parameters, such as the model name, GPU id, batch size, and image resolution. However, other parameters should remain unchanged. The trained network weights will be stored in the SPADE/checkpoints/“Model_Name” directory.
It’s worth noting that the Deep Graph Library (DGL) framework for GNNs and SPADE uses distinct code to parallelize tasks across multiple GPUs.
Therefore, if you intend to train using more than one GPU, you’ll need to replace the data_parallel.py script in your PyTorch installation (found at this location: (your_python)/site-packages/torch/nn/parallel) with the one available in the utils directory.
Testing
Before starting the test, make sure that the model is in the directory ./SPADE/checkpoints/“Model_Name”. Or if you downloaded the pretrained model from here, save it in the mentioned directory with the desired model name and you can download the specific test data for that model from here.
For testing the trained model, you can directly generate images from bounding boxes of various frames. This operation will produce images featuring only white cars, simulating a full 24-hour daylight cycle.
We’re currently developing a feature to easily customize car colors and time of day; in the meantime, you can experiment with these interactive elements via our demo tool.
Prior to image generation, transfer the .txt files containing the bounding boxes of each frame, in the same format output by YOLOv7, to the raw_data/test/boxes directory.
Finally, to generate the images, execute the following commands:
cd SPADEpython3 test.py --name traffic3d --dataset_mode custom --label_dir ../raw_data/masks/ --image_dir ../raw_data/images/ --label_nc 5 --no_instance --gpu_ids 0 --batchSize 24 --crop_size 640 --load_size 640 --project SUMMOEnsure that you specify the appropriate model name for testing in the name parameter.
Once the images are generated, you can assemble them into a video using the image2video.py script located in the tools directory.
By default, the output images are stored in the ./results/model_name/ directory.
Demo tool
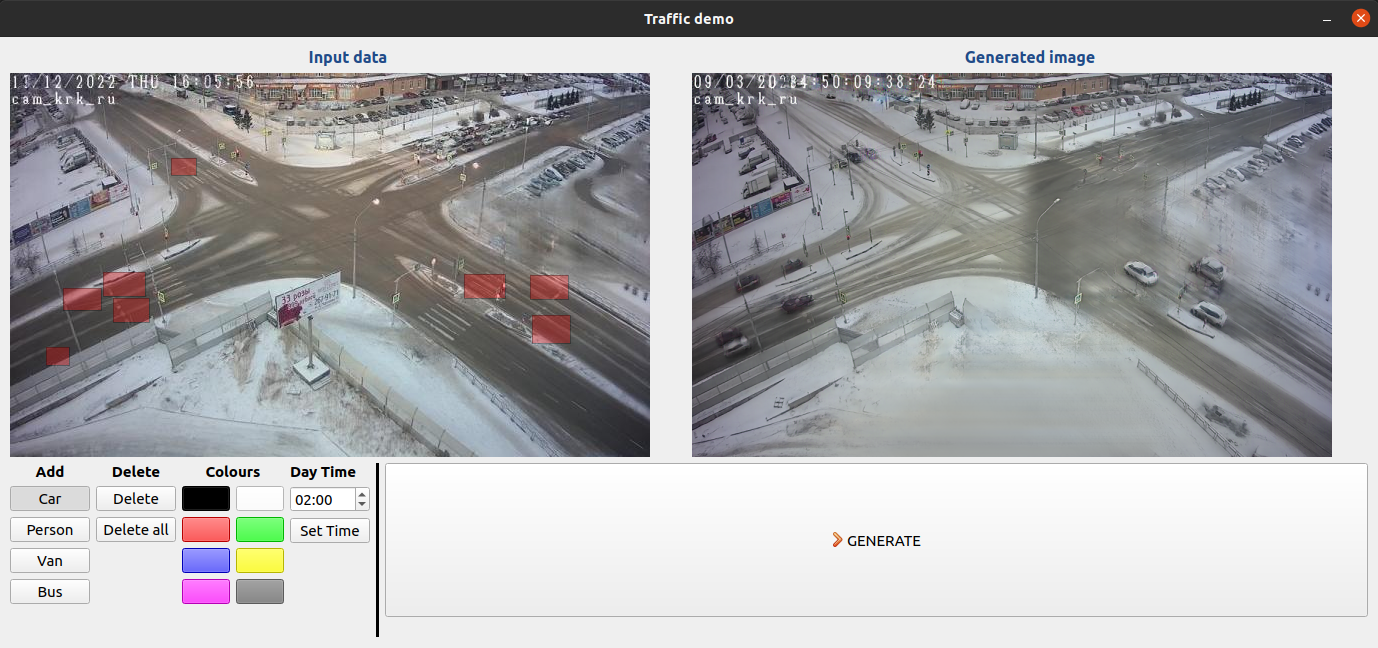
Fig. 2 Graphical interface of the demo tool
To evaluate the image generation model under various conditionings, we designed a tool with visual interface, as illustrated in Fig. 2. The graphical user interface (GUI) displays two distinct frames. On the left frame, the user is able to draw various bounding boxes, each denoting the placement of entities to be generated.
The entity type, its colour, and the time of day can be specified using the tools button, situated at the lower-left corner of the GUI. The right frame exhibits the image produced by the model, reflecting the entities and conditions specified within the left frame, upon pressing the “GENERATE” button.
To run the tool first move the weight of you trained model to the SPADE/checkpoints/traffic3d directory and then use the following commands:
cd demo_toolpython3 src/trafficdemo.pyCitation
You can use the following BibTex block to cite the work:
@article{rodriguez2023traffic, title = {Synthesizing traffic datasets using graph neural networks}, author = {Rodriguez-Criado, Daniel and Chli, Maria and Vogiatzis, George and Manso, Luis J}, booktitle = {International Conference on Intelligent Transportation Systems}, year = {2023}, organization = {IEEE},}